TODO sample:Try adding a field
Here, we will add a new field to the task list of the TODO sample. This requires work on both the admin panel and frontend code.
Changes to the content
The fields in the TODO sample originally looked like this:
| Display item name | Display item ID | Data type |
|---|---|---|
| Title | Title | Text |
| Assignee | Assignee | Text |
| Category | Category | Options |
| Status | Status | |
| Due date | DueDate | Date |
Let's add a text-type field here called WorkingTime.
| Name | Display item ID | Data type |
|---|---|---|
| Working time | WorkingTime | Text |
Admin panel:Add fields
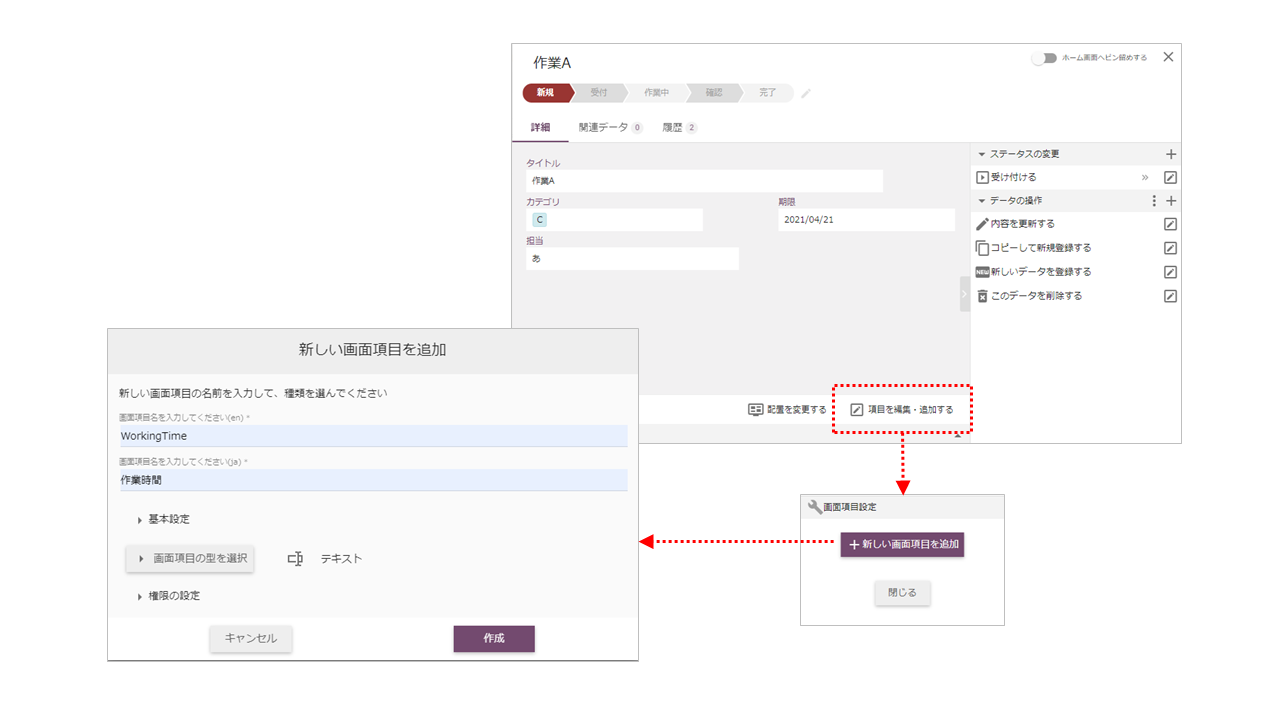
The first step is to add a "Work Time" field in the admin panel.
- Call the admin panel
- Click on any item in the application
- On the item details screen, click "Edit/Add Item"
- Click the "Add new screen item" button
- Set the following information in "Add new screen item"
- Display item name(en):WorkingTime
- Display item name(en):WorkingTime
- Display item type:Text
- Click the "Save" button
Admin panel:Set display item ID
Next, set the screen item ID of the added field.
- Click the edit button for the added field (work time)
- Set the screen item ID (Example: WorkingTime)
- Click the “Save” button
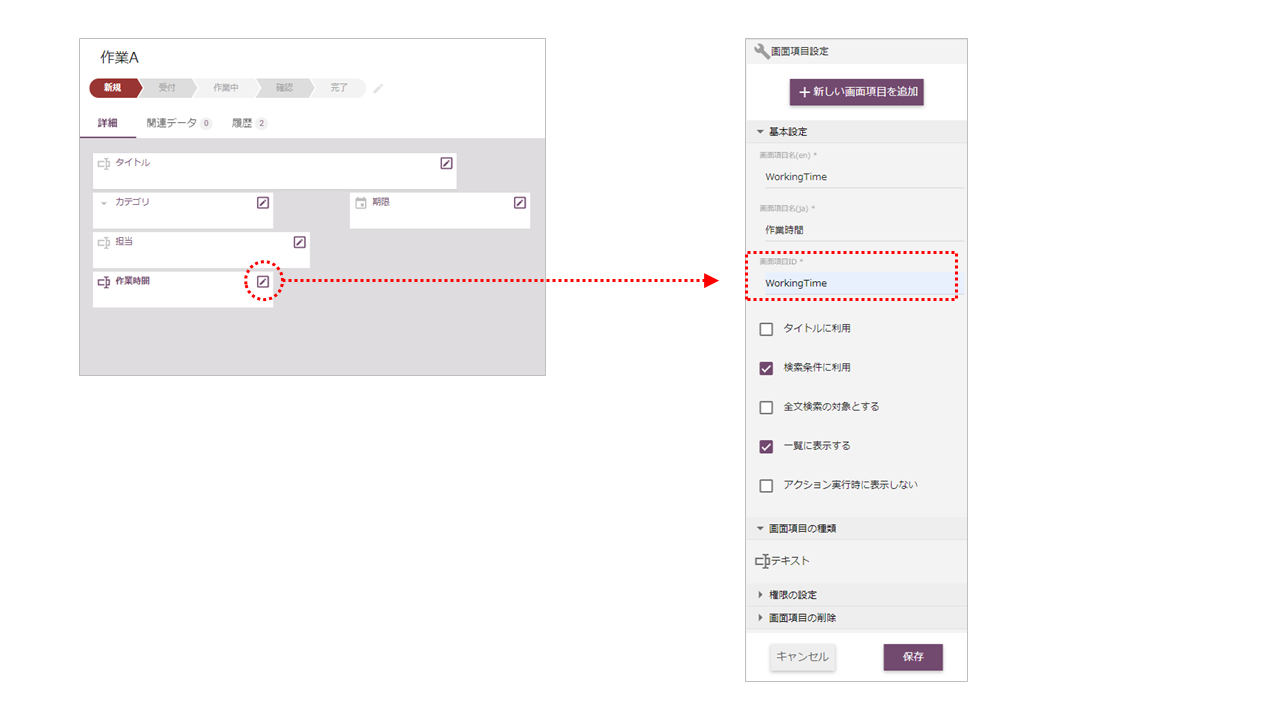
The added field is now displayed in the item list on the management panel.
Frontend: Add headings to the list
Next, modify the frontend code. First, add only a heading to the task list. No data is displayed yet. This modifies ItemList.vue as follows:
src\components\ItemList.vue
      headers: [
        { text: "タイトル", value: FIELDS.TITLE },
        { text: "担当", value: FIELDS.ASSIGNEES },
        { text: "カテゴリ", value: FIELDS.CATEGORY },
        { text: "ステータス", value: FIELDS.STATUS },
        { text: "期限", value: FIELDS.DUEDATE },
        { text: "作業時間", value: FIELDS.WORKINGTIME },  // Add
        { text: "操作", value: "actions", sortable: false },
      ],
Frontend:Display data in a list
Then display the data in the Work Time field in the Task List. You cannot add or update the data yet. To do this, modify datastore.js as follows:
src\constants\datastore.js
export const FIELDS = {
  TITLE: "Title",
  ASSIGNEES: "Assignee",
  CATEGORY: "Category",
  STATUS: "Status",
  WORKINGTIME: "WorkingTime",  // Add
  DUEDATE: "DueDate",
};
Frontend: Add fields to the add or update pop-up
Additionally, add fields to the add or update pop-up. The TODO sample ItemList.vue also includes pop-up code for adding and updating field values, so you can add fields just here.
src\components\ItemList.vue
    <v-dialog v-model="dialog" max-width="600px">
        <template v-slot:activator="{ on, attrs }">
            <v-btn color="accent" dark class="mb-2" v-bind="attrs" v-on="on">
                アイテム追加
            </v-btn>
        </template>
        <v-card>
            <v-card-title>
                <span>{{ formTitle }}</span>
            </v-card-title>

            <v-card-text>
                <v-container>
                <v-row>
                    <v-col cols="12">
                    <v-text-field v-model="editedTitle" label="タイトル" />
                    </v-col>
                </v-row>
                <v-row>
                    <v-col cols="12">
                    <v-text-field v-model="editedAssignees" label="担当" />
                    </v-col>
                </v-row>
                <v-row>
                    <v-col cols="12">
                    <v-select
                        v-model="editedCategory"
                        :items="categories"
                        item-text="name"
                        item-value="value"
                        label="カテゴリ"
                        return-object
                        single-line
                    >
                    </v-select>
                    </v-col>
                </v-row>
                <v-row>
                    <v-col cols="12">
                    <v-menu
                        v-model="datepickerMenu"
                        :close-on-content-click="false"
                        :nudge-right="40"
                        transition="scale-transition"
                        min-width="290px"
                    >
                        <template v-slot:activator="{ on, attrs }">
                        <v-text-field
                            v-model="duedateFormatted"
                            label="期限"
                            readonly
                            v-bind="attrs"
                            v-on="on"
                        ></v-text-field>
                        </template>
                        <v-date-picker
                        v-model="duedate"
                        no-title
                        @input="datepickerMenu = false"
                        />
                    </v-menu>
                    </v-col>
                </v-row>
                <v-row>   // 追加 --------------------------------------------
                    <v-col cols="12">
                    <v-text-field v-model="editedWorkingTime" label="作業時間" />
                    </v-col>
                </v-row>  // ここまで -----------------------------------------
                </v-container>
            </v-card-text>

            <v-card-actions>
                <v-spacer></v-spacer>
                <v-btn @click="close">
                キャンセル
                </v-btn>
                <v-btn color="accent" @click="save">
                <!-- <v-btn @click="save"> -->
                {{ saveButtonTitle }}
                </v-btn>
            </v-card-actions>
        </v-card>
    </v-dialog>
    <Confirm ref="confirm" />
Front end: Add/update data
Finally, modify the code in three places in ItemList.vue to add and update data.
First, add editedWorkingTime.
src\components\ItemList.vue
    editedWorkingTime: {
      get() {
        if (!this.editedItem[FIELDS.WORKINGTIME]) {
          return "";
        }
        return this.editedItem[FIELDS.WORKINGTIME];
      },
      set(val) {
        this.$set(this.editedItem, FIELDS.WORKINGTIME, val;
      },
    },
Add editedItem[FIELDS.WORKINGTIME].
src\components\ItemList.vue
    const editedItem = {};
    editedItem[FIELDS.TITLE] = itemDetails[FIELDS.TITLE].value;
    editedItem[FIELDS.ASSIGNEES] = itemDetails[FIELDS.ASSIGNEES].value;
    editedItem[FIELDS.CATEGORY] = itemDetails[FIELDS.CATEGORY].value;
    editedItem[FIELDS.DUEDATE] = itemDetails[FIELDS.DUEDATE].value;
    editedItem[FIELDS.WORKINGTIME] = itemDetails[FIELDS.WORKINGTIME].value; //Add
Add item[FIELDS.WORKINGTIME] to buildEditedItem().
src\components\ItemList.vue
    buildEditedItem() {
      const item = {};
      if (this.duedate) {
        const duedate =
          new Date(this.duedate + "T00:00:00+0900")
            .toISOString()
            .split(".")[0] + "Z";
        item[FIELDS.DUEDATE] = duedate;
      }
      item[FIELDS.TITLE] = this.editedItem[FIELDS.TITLE];
      item[FIELDS.ASSIGNEES] = this.editedItem[FIELDS.ASSIGNEES];
      item[FIELDS.CATEGORY] = this.editedItem[FIELDS.CATEGORY];
      item[FIELDS.WORKINGTIME] = this.editedItem[FIELDS.WORKINGTIME]; //Add

      return item;
    },
Now you can add fields to your frontend.
To add a number field
If you want to add a number field, convert the set(val) argument of editedWorkingTime to a number type as "parseInt(val)".
src\components\ItemList.vue
    editedWorkingTime: {
      get() {
        if (!this.editedItem[FIELDS.WORKINGTIME]) {
          return "";
        }
        return this.editedItem[FIELDS.WORKINGTIME];
      },
      set(val) {
        this.$set(this.editedItem, FIELDS.WORKINGTIME, parseInt(val)); // convert to number
      },
    },