TODO sample:Try adding status
Here, we will add a new status to the TODO sample. This requires work on both the admin panel and frontend code.
Contents to be changed
The TODO sample status originally looked like this: Arrows are actions that change status. The action ID is listed below the action. Call this action to change the status.
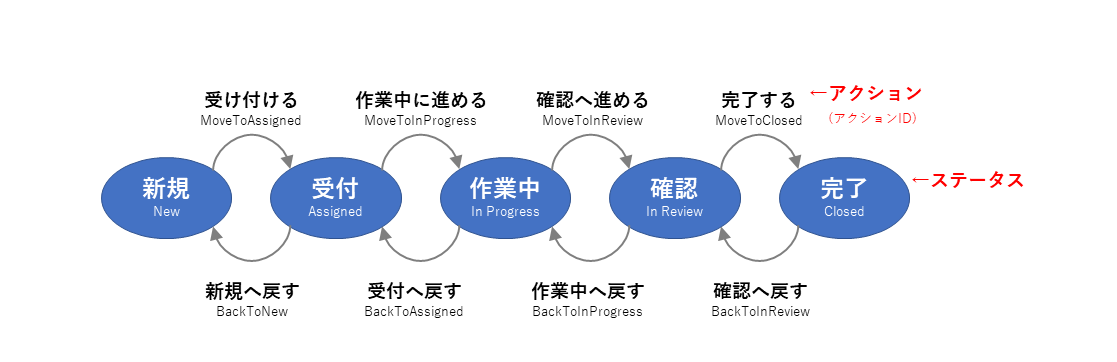
Add a "setup" (planning) status here. Then, add an action to move to this status. Also, change the source of the previous and next actions.

Add status on admin panel
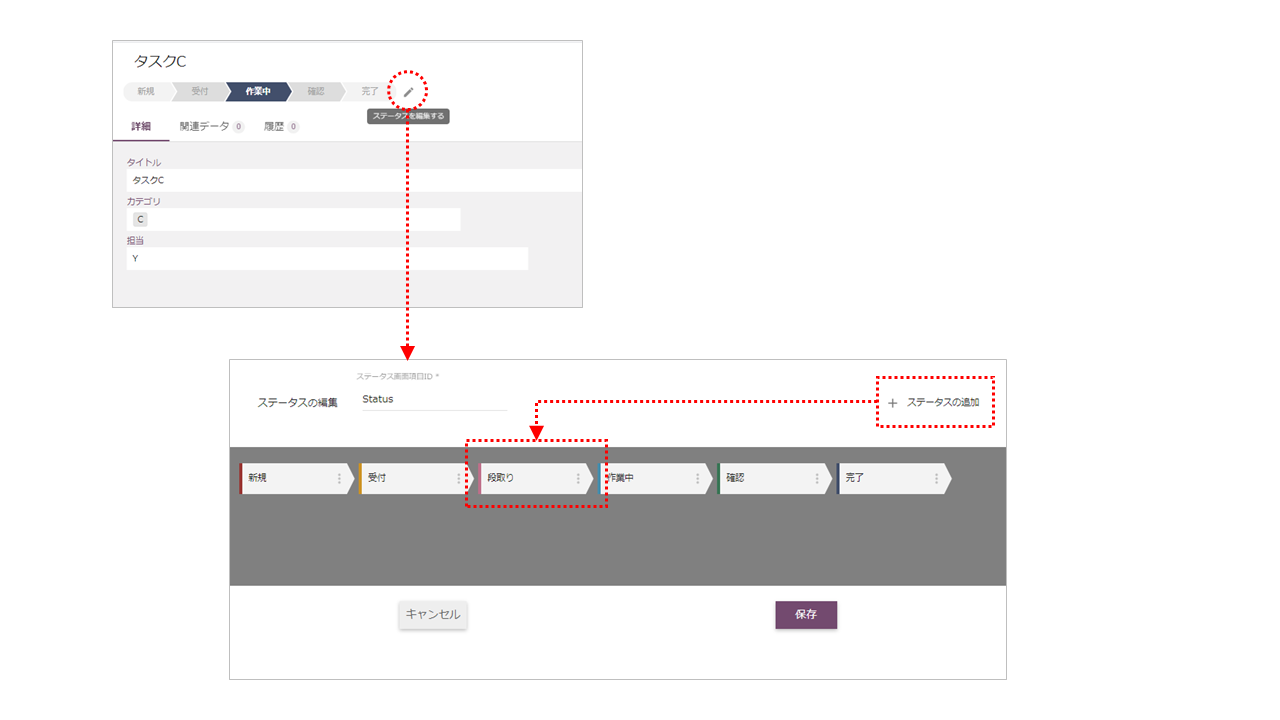
Now let's actually make the changes. First, add the "planning" status on the admin panel.
- Call the admin panel
- Click on any item in the application
- On the item details screen, click the "Edit Status" button
- On the status editing screen, click the "Add status" button
- Set the status name of the added status
- Place the status
- Click the “Save” button
Add or change actions on the admin panel
Next, add or change actions for each status.
- Select the item whose status you want to change
- Click “+ Add Menu” or “Change Menu”
- Set the action and action ID
- Click the “Save” button
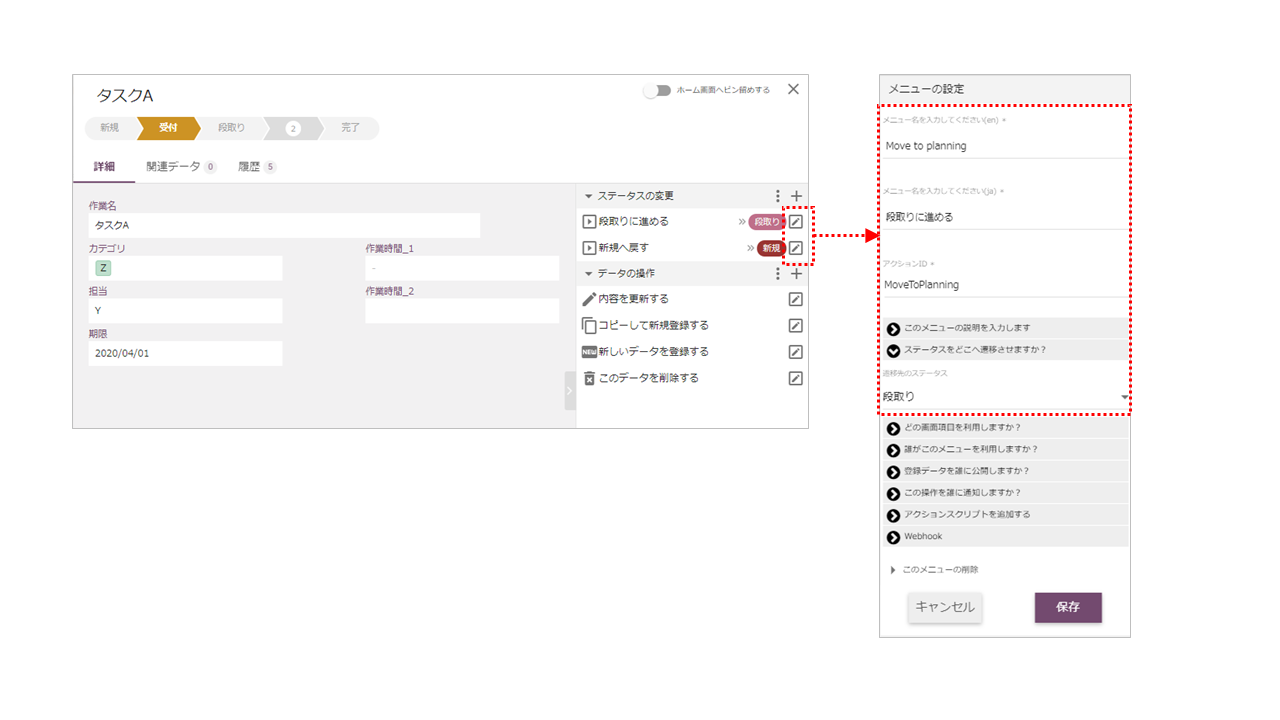
Here we set the action to the following status:
Reception status
- Proceed to setup:Move to planning 、Actionid = MoveToPlanning *
- Return to new:Back to New 、Actionid = BackToNew

Setup status
- Proceed to working:Move to InProgress 、Actionid = MoveToInProgress *
- Return to reception:Back to Assigned 、Actionid = BackToAssigned *

Work in progress status
- Proceed to confirmation:Move to InReview 、Actionid = MoveToInReview
- Return to setup:Back to planning 、Actionid = BackToPlanning *
Operation confirmation
Once you have configured this, let's check to see if the status and actions are working properly. On the admin panel, you should be able to transition the status to actions. Then, if you set the "setup" status in the admin panel, it will appear blank on the frontend side.
- Admin panel:Status change by action
- Frontend "setup" status is blank
Frontend: Display additional status
To display the added status in the TODO sample task list, add the setup status code in src/constants/datastore.js on the front end. At this time, also specify the background color of the setup status.
src\components\ItemList.vue
    getStatusColor(item) {
      const status = item[FIELDS.STATUS];
      let color = "white";
      switch (status) {
        case "新規":
          color = "light-blue lighten-3";
          break;
        case "受付":
          color = "light-blue darken-1";
          break;
        case "段取り":
          color = "purple lighten-2";
          break;
        case "作業中":
          color = "light-blue darken-4";
          break;
        case "確認":
          color = "cyan darken-1";
          break;
        case "完了":
          color = "cyan darken-4";
          break;
      }

      return color;
    },
Frontend: Set actions for additional status
For the action that transitions the status in the TODO sample, add the following code in src\constants\datastore.js. In this case, the ID is the action ID. The action to be added or changed is the action that was added or changed on the admin panel.
src\constants\datastore.js
export const STATUS_ACTIONS = {
  // prettier-ignore
  "新規": [
    {
      id: "MoveToAssigned",
      name: "受け付ける",
      icon: "mdi-arrow-right-box",
    },
  ],
  // prettier-ignore
  "受付": [
    {
      id: "BackToNew",
      name: "新規へ戻す",
      icon: "mdi-arrow-left-box",
    },
    {
      id: "MoveToPlanning",
      name: "段取りへ進める",
      icon: "mdi-arrow-right-box",
    },
  ],
  // prettier-ignore
  "段取り": [
    {
      id: "BackToAssigned",
      name: "受付へ戻す",
      icon: "mdi-arrow-left-box",
    },
    {
      id: "MoveToInProgress",
      name: "作業中へ進める",
      icon: "mdi-arrow-right-box",
    },
  ],
  // prettier-ignore
  "作業中": [
    {
      id: "MoveToPlanning",
      name: "段取りへ戻す",
      icon: "mdi-arrow-left-box",
    },
    {
      id: "MoveToInReview",
      name: "確認へ進める",
      icon: "mdi-arrow-right-box",
    },
  ],
  // prettier-ignore
  "確認": [
    {
      id: "BackToInProgress",
      name: "作業中へ戻す",
      icon: "mdi-arrow-left-box",
    },
    {
      id: "MoveToClosed",
      name: "完了する",
      icon: "mdi-arrow-right-box",
    },
  ],
  // prettier-ignore
  "完了": [
    {
      id: "BackToInReview",
      name: "確認へ戻す",
      icon: "mdi-arrow-left-box",
    },
  ]
};
The added "Setup" status can now be operated on the frontend.